Thursday, August 6, 2009

Installing JDK 6 Update 15 on Windows XP/Vista

Introducing Java to the new Java Programmer:

Before you install anything from Sun:

Java is an interpreted language. Unlike other high-level progamming languages like C++ that require a compiler/interpreter to convert source code (readable by the computer's hardware) into machine-language-form (0s and 1s), Java functions differently. It uses an interpreter called the Java Virtual Machine (JVM) to translate/compile source code to an intermediate form called bytecode. This bytecode enables Java programs to be run on any computer that has a Java RunTime (JRE - More on this coming up in a later paragraph) installed on it. This ability is identified with Java's "Write Once, Run anywhere" functionality.

While the JVM is one critical component, the other component that is fundamental for a Java Program to function is the Java Platform. The Java Platform is a set of classes and each class is a unit of Java code. These Java classes are available to the Java Programmer in what is known as the API.


The JVM is an Emulation Layer:
The JVM exists only in the memory of your computer. The difficult part of creating Java byte code is that the source code is compiled for a machine that does not exist. This machine is called the Java Virtual Machine, and it exists only in the memory of our computer. Fooling the Java compiler into creating byte code for a nonexistent machine is only one-half of the ingenious process that makes the Java architecture neutral. The Java interpreter must also make our computer and the byte code file believe they are running on a real machine. It does this by acting as the intermediary between the Virtual Machine and our real machine.

The Java Virtual Machine is responsible for interpreting Java byte code and translating this into actions or Operating System calls. For example, a request to establish a socket connection to a remote machine will involve an Operating System call. Different Operating Systems handle sockets in different ways - but the programmer doesn't need to worry about such details. It is the responsibility of the JVM to handle these translations so that the Operating System and the CPU architecture on which the Java software is running is completely irrelevant to the developer.

Compiler - A compiler translates a computer program written in a human-readable computer language (like Java) into a form that a computer can execute. You have probably seen EXE files on your computer. These EXE files are the output of compilers. They contain executables -- machine-readable programs translated from human-readable programs.

In order for you to start writing computer programs in a programming language called Java, you need a compiler for the Java language. A commonly used compiler is the one from Sun and you will get it when you download their JDK. Most developers (including myself) think of the Java Compiler as a tool that is invoked by running the command-line tool javac. We tend to invoke this tool when one wants to compile source code into class files.So it is the job of the compiler to compile source code (source code for a certain Java Program - along with other classes that our primary class depends upon - is called a compilation unit) while it is the job of the JVM to execute the .class files that the compiler created. Our Java Compiler is like any other program and the operating system needs to be told how to locate this executable program. We accomplish this by including the full path to the java compiler (javac) in the PATH variable.

The next section guides you through the process of downloading and installing Java. What does this mean. It means setting up the Once you have a compiler, we can get started. This process is going to take several hours, much of that time being download time for several large files.

Downloading the Java Compiler
In order to get a Java development environment set up on your machine -- you "develop" (write) computer programs using a "development environment" -- you will have to complete the following steps:

1. Download a large file containing the Java development environment (the compiler and other tools).
2. Download a large file containing the Java documentation.
3. If you do not already have WinZip (or an equivalent) on your machine, you will need to download a large file containing WinZip and install it.
4. Install the Java development environment.
5. Install the documentation.
6. Adjust several environment variables.
7. Test everything out.

Before getting started, it would make things easier if you create a new directory in your temp directory to hold the files we are about to download. We will call this the download directory.

Step 1: Download the Java development environment

Go to:http://java.sun.com/javase/downloads/index.jsp

Refer to screenshot below:


Step 2:


Go to: http://java.sun.com/javase/downloads/index.jsp

Press Continue to continue the download process.

Step 3:


Install the JDK & JRE
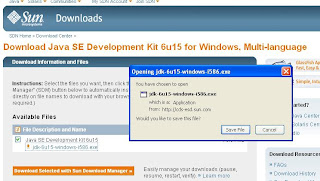
File: jdk-6u6-windows-i586-p.exe - J2SE Development Kit

Click on the .exe file and the .exe download begins as shown in the screenshot below:


Step 4:

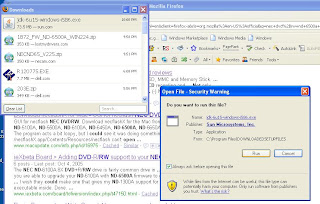
After download is finished, run the executable as below:


Step 7:

So what is a private JRE and what is its purpose?

A JRE is basically a folder that contains JVM executables, setting files, required lib files and extensions. Multiple JRE installations are allowed. Usually the JDK-JRE executable file will install the public JRE in C:\Program Files\Java as jre1.6.0_06 (for example).The public JRE is installed separately (outside JAVA_HOME) and is available for all other Java programs that can be run from the command line as java com.blogspot.ilangoskitchen/HelloRiley, and browsers as well. This JRE is also registered in the PATH environment variable and your browser plugin. Additionally this JRE is registered with the Windows Registry, can be removed via ADD/REMOVE Programs, might or might not be registered with browsers and might or might not have java.exe copied to the Windows system directory.

So what is a private JRE and what is its purpose? The private JRE is required to run the tools included with the JDK. It has no registry settings and is contained entirely in a jre directory (in my system this was C:\JDK6\jre or /jre) in a location that is known only to the JDK.


Step 8: Download the Java documentation and install it (Javadocs)
Read the installation instructions for the documentation. They will instruct you to move the documentation file to same directory as that containing the development kit you just installed. Unzip the documentation and it will drop into the proper place.


Install the Java Docs.
File: jdk-1-6-doc.zip

* Copy the .zip file to the root of the JDK install directory
(IE: C:\Program Files\Java\jdk1.6.0_06)
* Extract the file (make sure the unzip program keeps the directory structure in the zip file).
It will create a directory called "docs/etc..." with all of the files.
* Your Finished with the Doc install.

Sunday, August 2, 2009

Installing Java 6 on Mac OS Leopard 10.5.7


I started with a Mac that did not have the latest JDK on it. Perhaps it did have the the JRE 5 Runtime on it. Not sure. And I need JDK SE 6 and the JRE 6 Runtime. And setting this up on the Mac is not as trivial as it is on Windows. (I realized this later)

As a first step, I tried to download the JDK 6 from Apple's ADC, I tried to run the Java Documentation .pkg file in the hope that I can read the instructions on it and proceed with the installation of the JDK and the Runtime. But the installer let me know that it cannot proceed until I had Java SE 6 on my system. So the realization was that before I even install the documentation package, I needed the SE installed. I guess we do things differently on Windows. Welcome to the world of the Mac. This is what I did to remedy things. I downloaded Java for Mac OS OS X 10.5 Update 5_9m3092.dmg (Disk Image). This download went into Macintosh HD/users/samantha/Downloads (this location is the default location for all downloads).
Now, how do you use a .dmg file? It turns out that according to this source, I inferred that dmg stands for disk image and a when a disk image file is clicked, an icon (in a separate windows) that represents the original folder/file is shown to you. In my case it was a .pkg file. Double Click on this .pkg file. In this case it was JavaForMacOSOSX10.5Update5.pkg. I think the StuffIt thing in the background decompressed the Disk Image File and pulled up the .pkg file for us. (not sure though)

Mac happily told me that it installed the JDK. But pray, where? During installation, the tool did not give you any option to install in a folder of your choice. So how am I know where javac for JDK 6 is.
After a few faltering steps, I looked at Nirav's tutorial and Nirav's pointer that JAVA_HOME for OSX is /Library/Java/Home. So I drilled down to this directory, and then pulled up the information for javac as shown in the screenshot below:
Well, the location of javac then is: /System/Library/Frameworks/javaVM.framework/Versions/1.5.0/Home/bin. This could not be my JDK 6 JAVA_HOME. It is the old JDK 5 JAVA_HOME. So I went down to the folder, /Versions and found a /1.6.0/Home/bin/javac" and then found a javac file there. This then is my JDK 6. My brand new JDK 6 JAVA_HOME should be /System/Library/Frameworks/javaVM.framework/Versions/1.6.0/Home/


All these steps were not very terribly obvious. But here are the steps anyways. Click on Macintosh HD on your Desktop. Then drill down to /applications/utilities/java Preferences (this is like an exe file. So when you click on it, the Java Preferences Window opens up as below)


Firefox tip:
I was looking to relaunch Firefox (and restore all the Windows that I had open before). I clicked on the Firefox icon on the Dock. This pulled up a little rectangular window with three buttons. I clicked the button that said "Open Web Page" and that restored all the pages that Firefox said it would restore.

Mystery: Where did JDK 6 install itself?

My next task:
Installing Oracle on my Mac:
See this post first: http://www.pythian.com/news/1937/quick-install-guide-for-oracle-10g-release-2-on-mac-os-x-leopard-intel

Thursday, July 30, 2009

Our New Mac OS Leopard


Step 1:


Step 2:


Step 3:

So I tell Samantha that I need a Mac Book for Dummies or something like that! Starting this morning, I have started adding items to our blog when I discover configuration tips that I personally find useful. It is not meant to be a comprehensive list of everything you can do to customize OS X; it is mainly a record so I remember what customizations I've performed, so I can potentially undo them later and/or repeat them after major OS upgrades. Good resources for more Mac OS X configuration tips are macosxhints, lifehacker, secrets, and (somewhat less frequently) the official Apple Support site – most of the tips I've listed here were either found at one of those sites initially or have ended up archived there later.

Customization Tip 1: Samantha wanted her Date and Time changed.
We had July 29, 10: 54 PM or something like that. Today was July 30 and now was 10:04 AM, which meant I had to do something. So I try to launch System Preferences by clicking on the System Preferences Icon sitting in the Dock. That did not work, because the System Preferences Pane was supposed to open, right? And nothing happened. (Maybe I am doing something stupid here, so Samantha and the Mac Gods need to cut me some slack here, thanks!). Next I click on System Preferences at the upper left hand corner of our gigantic screen and looked under Services. No Date and Time. Looked like I was going anywhere with this for now. The next step actually solved my problem. I navigated to View -> Show all Preferences and I was able to pull up the System Preferences Pane for the first time and locate Date and Time! Significant change in my morning! After that it was a matter of obtaining access to it. And I did not discover this feature until I discovered "Click the Lock to make changes". This enabled me to go in and reset my clock. One little problem solved. Now, how did I create those screenshots? The following link helped: http://danstechnstuff.com/2007/12/30/easily-take-screenshots-in-mac-os-105-leopard/ (Thanks to the author of this blog). The gist of it was to use Shift + Command + 4 and then use this nifty cross hair thingy to get the screen shot you want. But wait, the cool thing about this is that, once you are done choosing your screenshot area, a camera in the background clicks automatically and then lo and behold, you have a picture on your desktop. This is saved as a .png file.
One little leap for Ilango and Samantha, one giant leap for Mac-Underdogdom!

Wednesday, July 22, 2009

Why did I create this blog?

So Samantha and I finally decided we were tired of PCs. We wanted to be on the other side of the fence. Samantha is a big fan of the Mac and has practical experience with them. I have tried Ubuntu before but have never really left the Microsoft camp. Well, I am not in the .NET camp. I am very much a Java evangelist. Have been for some years now. In 2007, I installed Ubuntu inside a VMWare Server Virtual Machine on my Windows Vista box. I took this server down a few months ago when I decided that Windows Vista pretended like it was this ancient car trundling along with Ubuntu in a hot desert road.
Well, I am now going to have my own all-Ubuntu system on an older Dell Laptop. This time, it will not be on VMWARE or Sun VirtualBox. As it turns out, Samantha handed me this Jaunty Jackelope CD from work and requested me to install it on her laptop. I said, "Well, let's take her out for a whirl and see what we can do". Samantha's Dell Laptop is a venerable old lady from Dell. She has seen much better days. Lately Windows and our own ways have been wearing her down. It looks like she won't hold up for much longer. And I ended up installing Ubuntu on her laptop.
So going back to why I created this blog, I draw upon my thinking in the earlier paragraphs and my own leanings with Java Technology in general. This is a blog that will record what I think will be useful to at least some in the technology community and some in the non-technology community (there are some people in the past who use computers but have loudly declared " I hate computers..ha ha" ).

In my next article I will tell readers how I got Ubuntu to work with Wireless.