Before you install anything from Sun:
Java is an interpreted language. Unlike other high-level progamming languages like C++ that require a compiler/interpreter to convert source code (readable by the computer's hardware) into machine-language-form (0s and 1s), Java functions differently. It uses an interpreter called the Java Virtual Machine (JVM) to translate/compile source code to an intermediate form called bytecode. This bytecode enables Java programs to be run on any computer that has a Java RunTime (JRE - More on this coming up in a later paragraph) installed on it. This ability is identified with Java's "Write Once, Run anywhere" functionality.
While the JVM is one critical component, the other component that is fundamental for a Java Program to function is the Java Platform. The Java Platform is a set of classes and each class is a unit of Java code. These Java classes are available to the Java Programmer in what is known as the API.
The JVM is an Emulation Layer:
The JVM exists only in the memory of your computer. The difficult part of creating Java byte code is that the source code is compiled for a machine that does not exist. This machine is called the Java Virtual Machine, and it exists only in the memory of our computer. Fooling the Java compiler into creating byte code for a nonexistent machine is only one-half of the ingenious process that makes the Java architecture neutral. The Java interpreter must also make our computer and the byte code file believe they are running on a real machine. It does this by acting as the intermediary between the Virtual Machine and our real machine.
The Java Virtual Machine is responsible for interpreting Java byte code and translating this into actions or Operating System calls. For example, a request to establish a socket connection to a remote machine will involve an Operating System call. Different Operating Systems handle sockets in different ways - but the programmer doesn't need to worry about such details. It is the responsibility of the JVM to handle these translations so that the Operating System and the CPU architecture on which the Java software is running is completely irrelevant to the developer.
Compiler - A compiler translates a computer program written in a human-readable computer language (like Java) into a form that a computer can execute. You have probably seen EXE files on your computer. These EXE files are the output of compilers. They contain executables -- machine-readable programs translated from human-readable programs.
In order for you to start writing computer programs in a programming language called Java, you need a compiler for the Java language. A commonly used compiler is the one from Sun and you will get it when you download their JDK. Most developers (including myself) think of the Java Compiler as a tool that is invoked by running the command-line tool javac. We tend to invoke this tool when one wants to compile source code into class files.So it is the job of the compiler to compile source code (source code for a certain Java Program - along with other classes that our primary class depends upon - is called a compilation unit) while it is the job of the JVM to execute the .class files that the compiler created. Our Java Compiler is like any other program and the operating system needs to be told how to locate this executable program. We accomplish this by including the full path to the java compiler (javac) in the PATH variable.
The next section guides you through the process of downloading and installing Java. What does this mean. It means setting up the Once you have a compiler, we can get started. This process is going to take several hours, much of that time being download time for several large files.
Downloading the Java Compiler
In order to get a Java development environment set up on your machine -- you "develop" (write) computer programs using a "development environment" -- you will have to complete the following steps:
1. Download a large file containing the Java development environment (the compiler and other tools).
2. Download a large file containing the Java documentation.
3. If you do not already have WinZip (or an equivalent) on your machine, you will need to download a large file containing WinZip and install it.
4. Install the Java development environment.
5. Install the documentation.
6. Adjust several environment variables.
7. Test everything out.
Before getting started, it would make things easier if you create a new directory in your temp directory to hold the files we are about to download. We will call this the download directory.
Step 1: Download the Java development environment
Go to:http://java.sun.com/javase/downloads/index.jsp
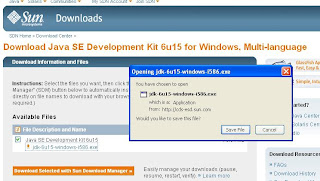
Refer to screenshot below:

Step 2:

Go to: http://java.sun.com/javase/downloads/index.jsp
Press Continue to continue the download process.
Step 3:

Install the JDK & JRE
File: jdk-6u6-windows-i586-p.exe - J2SE Development Kit
Click on the .exe file and the .exe download begins as shown in the screenshot below:

Step 4:
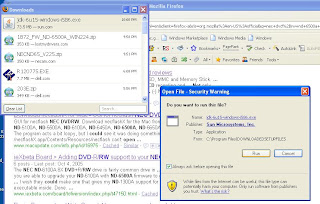
After download is finished, run the executable as below:

Step 7:
So what is a private JRE and what is its purpose?
A JRE is basically a folder that contains JVM executables, setting files, required lib files and extensions. Multiple JRE installations are allowed. Usually the JDK-JRE executable file will install the public JRE in C:\Program Files\Java as jre1.6.0_06 (for example).The public JRE is installed separately (outside JAVA_HOME) and is available for all other Java programs that can be run from the command line as java com.blogspot.ilangoskitchen/HelloRiley, and browsers as well. This JRE is also registered in the PATH environment variable and your browser plugin. Additionally this JRE is registered with the Windows Registry, can be removed via ADD/REMOVE Programs, might or might not be registered with browsers and might or might not have java.exe copied to the Windows system directory.
So what is a private JRE and what is its purpose? The private JRE is required to run the tools included with the JDK. It has no registry settings and is contained entirely in a jre directory (in my system this was C:\JDK6\jre or

Step 8: Download the Java documentation and install it (Javadocs)
Read the installation instructions for the documentation. They will instruct you to move the documentation file to same directory as that containing the development kit you just installed. Unzip the documentation and it will drop into the proper place.
Install the Java Docs.
File: jdk-1-6-doc.zip
* Copy the .zip file to the root of the JDK install directory
(IE: C:\Program Files\Java\jdk1.6.0_06)
* Extract the file (make sure the unzip program keeps the directory structure in the zip file).
It will create a directory called "docs/etc..." with all of the files.
* Your Finished with the Doc install.


